Indent Text Within Spreadsheet Cells in Excel
Indent Text Within Spreadsheet Cells in Excel

Pressing the [Tab] key in Excel does not indent text in a cell; it simply moves the cell pointer to the next cell. To indent text in a cell, follow the steps below.
Using the Increase Indent Button
- Enter your text into the document.
- Select the cell(s) whose entries you want to indent. (Make sure the cursor is not blinking within the selection.)
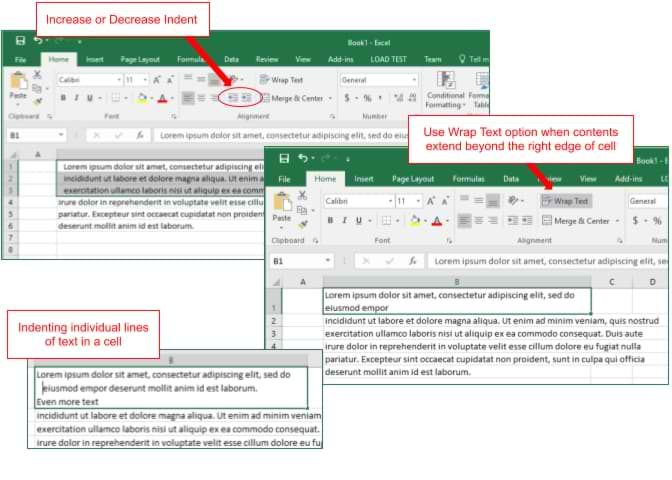
- Under the "Home" tab, in the "Alignment" group, click the "Increase Indent" icon (right-facing arrow pointing towards lines that resemble text). Each time you click the button, the selected text will indent further to the right.
- If you go too far, select the "Decrease Indent" icon (back-facing arrow) to move the text back toward the left.
Using Multiple Lines of Text Using Wrap Text Option
The wrap text option is useful if your text entry extends beyond the right edge of the cell. These instructions will show you how to change a cell's text alignment, so that the text wraps within the cell.
- Select the cell.
- Under the "Home" tab, in the "Alignment" group, choose "Wrap Text." Excel will make the contents of each cell visible by displaying it on multiple lines.
Indenting Individual Lines of Text in a Cell
While you can change the indentation for a whole cell, you can not automatically indent individual lines of a cell. However, you can still get this effect by completing the following steps:
- Select the desired cell(s).
- Turn on "Wrap Text" using the instructions above.
- Click your cursor into the desired cell.
- Type the desired text. To go to a new line, press [Alt]+[Enter].
- To indent individual lines of text, use the space bar to insert the desired space.
Warning!
When you indent individual lines of a cell by inserting spaces, note that the formatting may change if you resize the cell
When you indent individual lines of a cell by inserting spaces, note that the formatting may change if you resize the cell


