How to Find Clip Art in Word

How to Find Clip Art in Word

Each version of Microsoft Word below has slightly different steps for finding and inserting clip art. Follow the instructions for the Microsoft Word version you currently use.
For Word 2016 and 2013:
- Open the Word where you would like to insert the clip art.
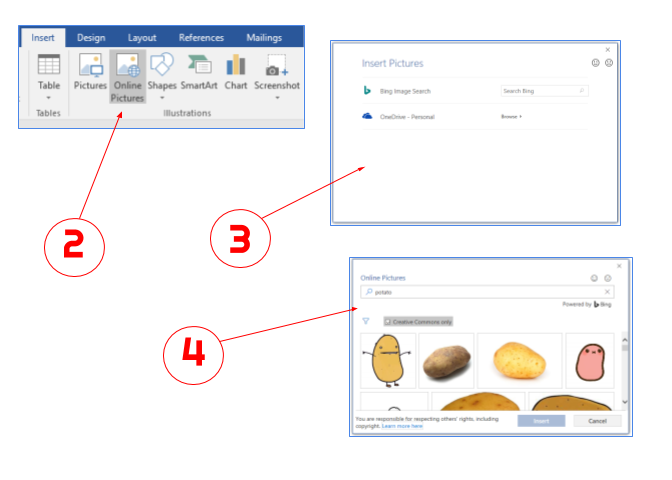
- Click the [Insert] tab > From the "Illustrations" group, click [Online Pictures]. A pop-up will appear allowing you to search Office.com or Bing.
- In one of the search boxes, type a keyword for the clip art you would like to find (e.g., potato) > press [Enter].
- From the resulting list of pictures, choose the one you would like to add > Click [Insert].
For Word 2010:
- Open the Word document where you would like to insert the clip art.
- Click the [Insert] tab > From the "Illustrations" group, click [Clip Art]. A clip art pane will open to the right of the document.
- In the "Search for" box, type a term or keyword for the clip art you would like to find (e.g., "potato") > Click [Go]. The clip art will appear in the pane below.
- To insert the clip art, place your cursor where you would like to insert the clipart in your document and click the image from the clip art pane.
For Word 2007:
- Open the Word document where you would like to insert the clip art.
- Click the [Insert] tab > From the "Illustrations" group, click [Clip Art]. A clip art pane will open to the right of the document.
- Select "Organize Clips" on the bottom of the pane.
- In the left menu, double-click "Office Collections."
- Double-click any category that interests you.
- To insert the clip art, place your cursor where you would like to insert the clipart in your document and click the image from the clip art pane.
Posted in Computer Help


